
Flavorful Fridays will feature some of my favorite recipes as well as some of my favorite places to eat! Bubble gum ice cream with gummy bears, anyone?!!


************
Bubble Gum
So anyways,
I like to eat my ice cream with the little taste tester spoons!
Aaahhh!! Yep! It's completely true! I can't
deny it! I always pretend that I want to taste some random flavor
while I am there so that I don't feel like a
dork just asking for the spoon! Believe me, I've gotten some funny
looks. Ya know, the "is she serious?
Seriously?" looks. That's okay though! It's all worth it to me!
************
Enchilada Casserole


************

************


************

************
A twist on PB&J
The other day we were making sandwiches.
Sometimes bug likes Turkey & Cheese.
Sometimes he just likes Peanut Butter.
Sometimes I can put some honey in there.
He's a picky kid.
Today, he chose PB&J.
I asked him if he would also like a slice of turkey just to eat {as he often does}.
He said that he would like one and also asked for some cheese.
The next thing I knew, he had placed his cheese & turkey on TOP of his PB&J sandwich!

EWE!
He actually ate the entire thing!
Go figure!
....and if you give a bug a pbjt&c sandwich, he's going to want some carrots to go with it ;}
************
Lettuce Wraps
All I can say is that this tastes even better than how delicious these photos look!!!!
...and it is soooo easy to make!

What you need:
1-2 boneless, skinless chicken breasts {organic is the best way to go with chicken!}
1 Head of lettuce
White rice {1/2 cup for each person should be plenty}
Lots and lots of veggies!! We used...
Broccoli
Purple onions
Red, Yellow and Green bell peppers
Carrots
Celery
Green onions
How to Make:
Cut up your chicken and place in frying pan.
Start boiling the water for your rice-if you do the minute rice like we do-and get that cooking {sorry, no pic for those 2 steps}.
While your chicken is cooking away, cut up all of your veggies and place in a separate frying pan, stirring occasionally.
Oh I LOVE how colorful this is!!
Doesn't it just look so healthy!
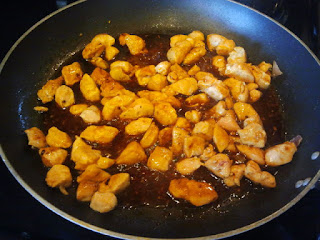
Once the chicken is cooked, pour in a small amount of Teriyaki sauce.
Just enough to lightly coat the chicken.
Once the chicken has 'soaked' for about 5 min or so in the sauce, add it to the veggie mix.

Stir!
I cannot even begin to describe to you how yummy this smells!

Sometime during this whole process of cutting up veggies and cooking chicken,
grab a small pot and pour in the rest of your teriyaki sauce {or as much as you would like}.
Just so you know, we used a couple of different kinds of sauce.
We added some sweet and some spicy to get just the right flavor that we were craving that night.
We also added some brown sugar to sweeten it up even more and let me tell you-it was fabulous!

Once everything is done you will want to pull apart your head of lettuce.
Place a small amount of rice in the lettuce 'bowl' then a scoop full of veggies and then a spoon full of teriyaki sauce.

Eat and Enjoy!
I cannot wait to make this again!!!
{thank you to my fabulous SIL for this oh so delicious dinner!}
************
Corn Chowder
So, I shared a picture of this yummy soup on my FB the other day and had so many people ask for the recipe so here it is!!
Sorry that I don't have pictures of showing all the different steps.....I wasn't home while it was being made!!

What you need:
3 cans cream of potato soup
1 can of milk per each can of potato soup you use {so in this case, 3 cans of milk. If you are making more or less, make sure that the cans of milk and cans of potato soup you use are of equal quantity}.
3 cans whole kernel corn
1 can mixed vegetable medley {with carrots, peas, green beans, etc in it}
1 package of whole baby carrots {use however many you want}
1-2 potatoes-diced
1 onion-diced
1 package of bacon
How to make:
In a large pot, add the soup, milk, corn & can of mixed veggies.
In one pan, steam the diced potatoes and baby carrots.
In another pan, cook the bacon. KEEP THE GREASE in the pan! Once the bacon is cooked {about well done but not burnt}, remove it. You will want to crumble {or cut with kitchen sheers} the bacon up into the pot of soup. Then sautee the diced onion IN the bacon grease. This adds soooo much flavor!
Once the potatoes and baby carrots are nice and steamed, add them to the pot of soup along with the sauteed onions.
Add lots of pepper and some garlic. You can use organic garlic from a jar or dry garlic like you find in the spice aisle.
{No need to salt as the cans of soup have plenty of that already!}
Cook through until everything is nice and hot!
Serve!
This will make approximately 6-8 servings.
{In the photo above-extra was made to have plenty of leftovers since we were having lots of people over for dinner that night!}
Recipe courtesy of my SIL whom, I believe, got it from my MIL :)
************
Banana Split Dessert
I shared this dessert on Jamielyns fabulous blog the other week and am now posting it here!
This dish is just pure heaven and I am so excited to share it with you!
What you need:
~2 sticks of butter
~1 12oz bag of milk chocolate chips
~2 cups of powdered sugar
~1 large can of evaporated milk
~2 packages of graham crackers
~2 boxes of vanilla ice cream {necessary to get the boxes instead of a tub}
~1 bunch of bananas

How to make:
First you will need to make the topping!
Melt 1 stick of butter in a sauce pan and then add the bag of chocolate chips, constantly stirring until fully melted.

Then add 2 cups of powdered sugar and immediately thereafter, whisk in the evaporated milk.

Constantly stir. Boil about 2 minutes until nice and bubbly.
{The mixture will not be very thick at this point}.

Place the chocolate mixture into the freezer {still in the pan}. It will need to stay in there until it is cooled. Probably several hours. I suggest that you occasionally go in and stir the mixture in the freezer so that it will all cool, not just the edges. It will then start to thicken up.
{sorry the photo is blurry-you get the idea!}

In the meantime, start making the base of the dessert!
Put both packages of graham crackers in a zip lock baggy and crush them until they are nice and crumbly! This is the beginnings of your crust! I used a rolling pin for this part. If you think ahead, you can just use a food processor to make your crumbs :) My mom didn't remind me that she had one until I was halfway done crushing up my crackers!
It's still fun to do it this way, though!

Put your crumbs into a 9x13 dish. I used an old school tupperware that I stole, I mean, borrowed, from my mom years and years ago! It's what we always put this dessert in and now I won't make it in anything else! You can use any kind of tupperware or a cookie sheet but make sure that it has a lid.

Next you will melt 1 stick of butter in the microwave. Then pour it over the crumbs in your dish. Then take a spoon to mix the crumbs and butter all together and spread evenly along the bottom of the dish.

Then you will want to fully open your first box of ice cream. Cut approximately 1" slices and place directly on top of the crust. Depending on how thick you cut your ice cream or how big your dish really is will determine if you end up needing to use the second box of ice cream
{I always do, though}.
Then it's a good idea to kind of push down on the ice cream and make sure that there aren't any huge gaps anywhere.

Next, take those perfectly ripe bananas and start slicing away! Just let them fall as they may onto the top of the ice cream, or you can place them evenly all over. I use about 3 bananas but you can definitely use more!
{At this point, my mom decided that I had enough left over ice cream that she started making her own so we wouldn't have to share!! Works for me! Dad will sure be excited!}

Place the dessert in the freezer until your chocolate topping is completely cooled.
{If it isn't, when you pour it on top of your ice cream, it will melt right through it. In all honesty, it still tastes just as fabulous, it just doesn't look smooth or 'professional'!}
Once it is cooled, pour the chocolate on top of your crust, ice cream, banana base. Be sure to get a spatula to eat any of the leftover chocolate in the pan that didn't make it onto your dessert!
You wouldn't want to waste any, now would you?!!

Place it in the freezer again.
Allow several hours for this to set before serving. In fact, I recommend you make this dessert the night before you plan to serve it so that it will be perfectly chilled!

Serving size is approximately 12.

Ta Da!!! There you have it! I hope you enjoy!!
************
Bubble Gum
So, I had these huge plans for St. Patty's day. I was going to put together a cute little jar of candies for husband to take to work with him, I was going to put some cute tags that I printed out onto some items I bought the other day for husband and bug, and I was planning on making cupcakes {using green food coloring, of course}. Did it happen? Nope! But it was the thought that counts, right? Maybe next year my plans will work out! I will start traditions with my {almost} 4 year old eventually!
So anyways,
I like ice cream....a lot. It's so yummy! I like Baskin Robbins....a lot. It's SUPER yummy!
Baskin Robbins is my most favorite place to get ice cream and I
always get the same 2 things:
always get the same 2 things:
Banana Malt OR 2 scoops of Bubble Gum ice cream with gummie
bears on top!
bears on top!

Yes, I just said that!
I remember getting this little concoction ever since I was little.
That's not all though
{and I really can't believe that I am about to admit this!}.....................
That's not all though
{and I really can't believe that I am about to admit this!}.....................
I like to eat my ice cream with the little taste tester spoons!
Aaahhh!! Yep! It's completely true! I can't
deny it! I always pretend that I want to taste some random flavor
while I am there so that I don't feel like a
dork just asking for the spoon! Believe me, I've gotten some funny
looks. Ya know, the "is she serious?
Seriously?" looks. That's okay though! It's all worth it to me!
It makes my ice cream last longer AND it makes my ice cream taste better!! hehe
So what are you favorite ice cream flavors?!
************
Enchilada Casserole
What you need:
1 lb hamburger or turkey burger {we actually ended up using Moose burger this time! We got it from my father in law who was able to get a bull moose during last years hunting season!}
1 med. onion, chopped {I had a large onion so I only used part of it}
1 green pepper
3 8-ounce cans of tomato sauce
2 3-ounce can of green chilies
1 dozen corn tortillas
1 lb cheddar cheese, grated {I use colby jack}
**optional-I use 1 can of green chilies and then add some jalapeños to give it a little more heat!

***I used my large electric fryer for this but if you have a large enough frying pan or wok, that will work just fine too!
How you do it:
Brown onions, green pepper and hamburger. {mmm the smell that this mixture gives off is one of my favorites!!} Drain any fat.

Add tomato sauce {use 1.5-2 cans at this point} and green chilies {and jalapeños if you use them}

Pour the remaining tomato sauce into a separate dish and dip the tortillas into it to coat both sides.

Then layer in a 9x13 casserole dish like so.
You want to make sure that you layer them, not just on the bottom of the dish, but the sides as well {I use 8 tortillas for this part}.
You want to make sure that you layer them, not just on the bottom of the dish, but the sides as well {I use 8 tortillas for this part}.

Next add half of the hamburger mixture and half of your grated cheese.
Then add another layer of the tomato sauce-dipped tortillas.

This time, you can just layer them flat {no need for them to go up the sides of the dish-I use 6 tortillas for this part}.
Then add the rest of the hamburger mixture {at this point, you can pour any of the remaining tomato sauce you have on top...but I don't}. Top with the remaining cheese.

Bake at 350 degrees for approximately 25 minutes {or until cheese is melted}.
Serving size is approximately 6-8.
I decided to serve mine with some corn!

I have to tell you that the leftovers are just as good for this delicious meal! However, we decided to invite some family over to share in the yummy goodness instead!
I had to throw this photo in as well!

We made my little bug move to the big kid table because he and his two cousins wanted to play more than eat their food so husband got to sit at the little kid table with our niece and nephew! They thought that was pretty funny!
**Note to husband, when you are put at the kiddy table to keep the peace, you are not allowed to play around either! Remember that for next time *wink*
I hope you enjoy!!
{FYI, I cannot take credit for this fabulous dish...I got it from a girlfriend of mine and it easily became one of our favorites!}